Welcome to Part II of the modern CMake workflow series. In this post we will create a simple example of a small project which will help us to really grasp the concepts explained on Part I. Also I'll share this small project on a github repository which once cloned it will help you start a new C++ project with all the conventions mentioned in Part I in place.
What are we building?
OK so lets build a short and easy example of a module, something useful and not too complicated for the purpose of this blog post. For this example we will make a simple system module with a Logger which will be a private interface of the spdlog library.
To start building this module we will need the following:
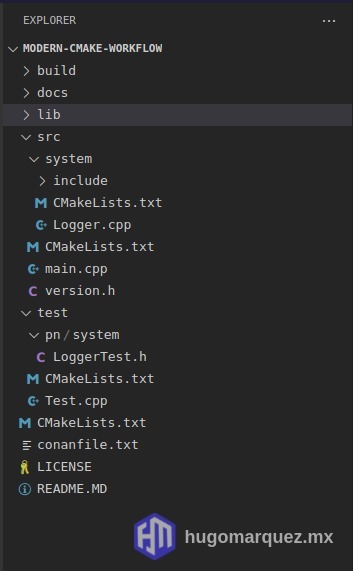
- Create our module directory inside the src folder. The name of the parent folder will be our module's name in this example it will be called system.
- Inside our module's directory we need to create the public header's directory and we will follow Part I naming conventions. So for our example we will use the pn namespace, which stands for project namespace, it will be as follows: include/pn/system/.
Here is an expanded view of the project's tree:

The System Module
We'll build a simple interface to the spdlog logger, we will start with a singleton pattern to build this feature. First we need a public header so other libraries that link to this module may be able to log to the console even though they won't have access to the spdlog library.
#pragma once

/**
 * Notice we didn't include the spdlog library here,
 * it was included in the source file so we can make it a
 * private dependency.
 *
 * If you include a header of a dependency on a public library header,
 * then that dependency needs to be declared public as well.
 **/

#include <string>

namespace pn {
  class Logger {
    public:
      // Singleton Manager
      static Logger *getInstance()
      {
        if (instance == nullptr) {
          instance = new Logger();
          return instance;
        }
        return instance;
      }

      static void setLevel(int level);
      static void debug(std::string msg);
      static void info(std::string msg);
      static void warn(std::string msg);
      static void error(std::string msg);
      static void critical(std::string msg);

    private:
      Logger(){ setLevel(1);}
      static Logger *instance;
  };
}
This is a simple header, we defined the Logger class which is a singleton with static methods, every method corresponds to the different types of logs spdlog has and each receives a string parameter as a message.
Now that we have our Logger specification it is time to write the implementation of it:
// Include our public library header
#include <pn/system/Logger.h>

/**
 * Notice we included spdlog here instead of the Logger header,
 * this is because we want to make it a private dependency
 *
 **/
#include <spdlog/spdlog.h>
#include "spdlog/sinks/stdout_color_sinks.h"

namespace pn {
  Logger* Logger::instance = 0;

  void Logger::setLevel(int level)
  {
    switch (level) {
      case 1: spdlog::set_level(spdlog::level::debug); break;
      default: spdlog::set_level(spdlog::level::debug); break;
    }
  }

  void Logger::debug(std::string msg) { spdlog::debug(msg);}
  void Logger::info(std::string msg) { spdlog::info(msg);}
  void Logger::warn(std::string msg) { spdlog::warn(msg);}
  void Logger::error(std::string msg) { spdlog::error(msg);}
  void Logger::critical(std::string msg) { spdlog::critical(msg);}
}
The implementation is simple, we just instantiate our Logger object and refer every type of log to the corresponding spdlog function.
The Main Executable
To create our main executable we first need to create a CMakeLists.txt where we will tell the build environment about it, add the subdirectory of the system module and link the main executable with our system library.
# Add modules
add_subdirectory(system)

# Create our main executable
add_executable(main main.cpp)

# Link privately our main executable with our shared libraries
target_link_libraries(main PRIVATE pn-system)
And now the main executable with the main function which just calls each type of logs:
#include "version.h"

// Include system module's logger
#include <pn/system/Logger.h>

int main(int argc, char const *argv[]) {
  pn::Logger::setLevel(1);
  pn::Logger::info(PN_INFO);
  pn::Logger::debug("This is a debug log");
  pn::Logger::warn("Beware of this log!");
  pn::Logger::error("Oops something went wrong!");
  pn::Logger::critical("I'm ded :(");
  return 0;
}
You might have notice the version header, which is just a header with pre-processor functions defining the version and description of the project:
#pragma once
#include <string>

#define PN_VERSION_MAJOR 0
#define PN_VERSION_MINOR 0
#define PN_VERSION_PATCH 1

#define STRINGIFY(x) #x
#define TOSTRING(x) STRINGIFY(x)

#define PN_VERSION "v" TOSTRING(PN_VERSION_MAJOR) "." TOSTRING(PN_VERSION_MINOR) "." TOSTRING(PN_VERSION_PATCH)
#define PN_NAME "Project Name"
#define PN_DESCRIPTION "Project Description"
#define PN_COPYRIGHT "http://hugomarquez.mx \t (C) 2022"

#define PN_INFO "\n" PN_NAME ": " PN_DESCRIPTION "\n" PN_VERSION "\n" PN_COPYRIGHT "\n"
Test-Driven Development
For our testing purposes we need to create a CMakeLists.txt, which its sole concern will be finding the testing framework library, the main testing executable with the linkage of our modules.
# Find required package/framework for testing
# In this case I'll be using Catch2
find_package(Catch2 REQUIRED)

# Create main test executable
add_executable(Test Test.cpp)

# Link with pn-system library
target_link_libraries(Test PRIVATE pn-system)

# Link with Catch2 testing framework
if(Catch2_FOUND)
  message("-- [TEST]: Required library Catch2 found!")
  set(Catch2_test_util "${Catch2_LIB_DIRS}/cmake/Catch2")
  target_link_libraries(Test PRIVATE Catch2::Catch2)
endif(Catch2_FOUND)

include(CTest)
include(${Catch2_test_util}/Catch.cmake)
catch_discover_tests(Test)
And for our test executable we have the following example:
// This tells Catch to provide a main() - only do this in one cpp file
#define CATCH_CONFIG_MAIN
#include <catch2/catch.hpp>

// Here we include our system module's test following the directory naming convention
#include "./pn/system/LoggerTest.h"
Finally lets build our test! This will be very simple because our Logger class only refers the spdlog functions with static methods. So we only need to test that the singleton pattern is not returning a null or empty object.
#include <string>
#include <catch2/catch.hpp>
#include <pn/system/Logger.h>

using namespace pn;

TEST_CASE("pn::Logger", "[System]") {

  SECTION("#getInstance()") {

    // Singleton pattern, shouldn't return 0
    REQUIRE(Logger::getInstance() != 0);
  }
}
Putting it all together!
Getting our dependencies
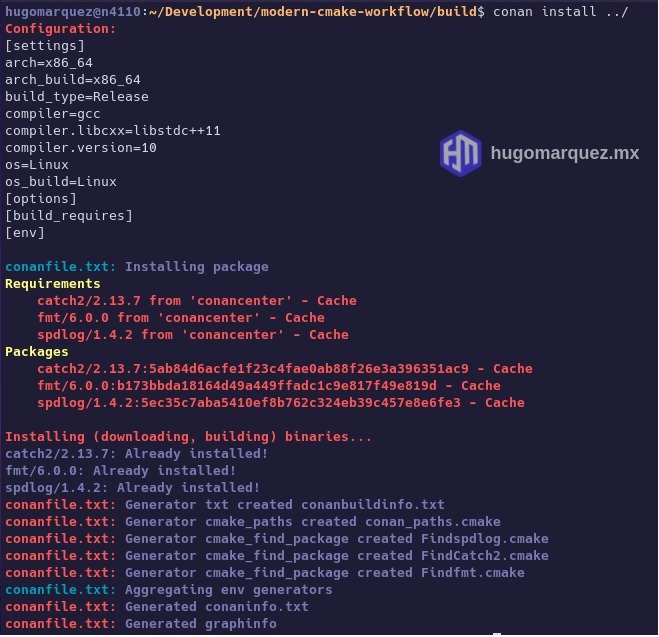
To get our dependencies from conan we navigate to the build folder and run the following command:
$ conan install ../This will download our dependencies and the modules required to find them using CMake:

Generating and compiling our build files
To generate our build files, which in my case I'll be using makefiles, we need to run the cmake generator inside the build directory:
$ cmake ../
Running the tests
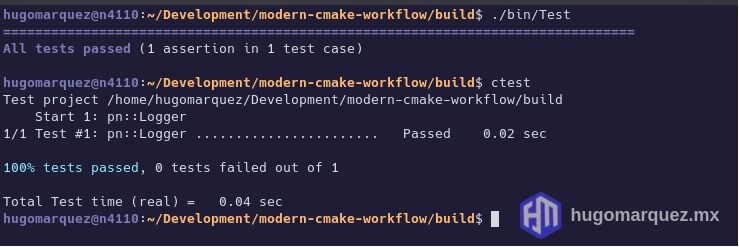
We have several options to run our tests, we can use CTest or just simply running the test executable, I'm going to show both versions of it:

Running our main executable
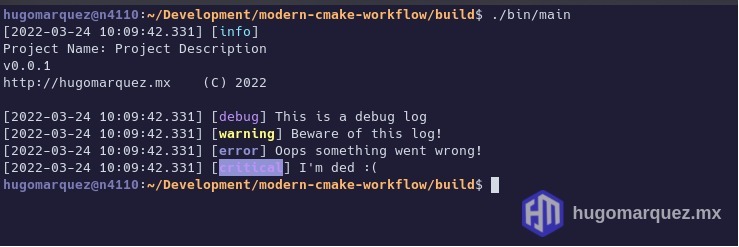
Finally it is time to run our main executable, when we run it we should see all our logs being displayed on the console:

Thank you for reading my post, it was a long journey but we had fun... right? Either way I really hope you found this helpful and I'll be leaving you with the github repository if you would like to use this as a template for your new C++ projects.
Bottoms up! 🍻


