When I was learning a modern approach to CMake, I remember it was difficult! There were a lot of rules and sometimes those rules didn't make any sense unless there was an example of it. Another thing that hinder my learning curve of CMake was the vast amount of open source projects that uses "old" CMake.
To solve this and based on some of the resources I've listed below, I developed a customized version on how to effectively use modern CMake on your C++ projects. Of course it goes without saying this is based on my own experience and things could be subject to change, besides I'm encouraging to make your own changes to this workflow.
In Part I of this post, I'll make a brief introduction to modern CMake, what type of problems it tries to solve and how we can start using it. Then I'll recommend a project structure as a skeleton for new projects as well as some tools for dependencies. Finally some resources I consider fundamental to really understand how to use modern CMake.
As I stated above one of my biggest hinders was the lack of examples, so to be part of the solution in Part II we'll make a small and simple example of a module as a shared library with a testing environment and private dependencies.
What is "Modern CMake"?
CMake is a collection of open source tools that are designed to build, test and package software. It is used to control the compilation process through configuration files that generates native makefiles or workspaces that can be used to compile on the environment of choice. In short, CMake is not a build system, but a collection of tools that generates another system's build files.
CMake is constantly evolving and the most significant additions were released in version 3.0 which is what we called "Modern CMake". Despite this constant evolution and benefits many software engineers and programmers are not using them due to the lack of knowledge or some sort of resistance to modernizing old code base.
To get started with modern CMake you need to update your installation to the latest version of CMake, and add to your CMakeLists.txt the minimum required version to 3.10 or above. Below is a minimal CMakeLists.txt file that you can use as a reference to in your CMake and C++ projects.
cmake_minimum_required(VERSION 3.10.2)

# Set version variables
set(version_major "0")
set(version_minor "0")
set(version_patch "1")

# Set project version
set(project_version "${version_major}.${version_minor}.${version_patch}")

# Set the project and description
project(ProjectName VERSION ${project_version} DESCRIPTION "Project Name" LANGUAGES CXX)

# Set custom cmake modules path
set(CMAKE_MODULE_PATH ${CMAKE_MODULE_PATH} "${CMAKE_SOURCE_DIR}/cmake/")

# Set output paths
set(CMAKE_RUNTIME_OUTPUT_DIRECTORY ${CMAKE_CURRENT_BINARY_DIR}/bin)
set(CMAKE_ARCHIVE_OUTPUT_DIRECTORY ${CMAKE_CURRENT_BINARY_DIR}/lib)
set(CMAKE_LIBRARY_OUTPUT_DIRECTORY ${CMAKE_CURRENT_BINARY_DIR}/lib)

# Use c++11 flag for all modules
add_definitions("-std=c++11")

# Conan setup for dependencies
include(${CMAKE_BINARY_DIR}/conan_paths.cmake)

# Add sources
add_subdirectory(src)

# Testing
# PN stands for project namespace, change accordingly
option(PN_BUILD_TESTS "Determines whether to build tests." ON)
if(PN_BUILD_TESTS)
  enable_testing()
  add_subdirectory(test)
endif(PN_BUILD_TESTS)
Thinking in Modules
For example, imagine you're working on a delivery application similar to Uber Eats, you might have an architecture similar to this:
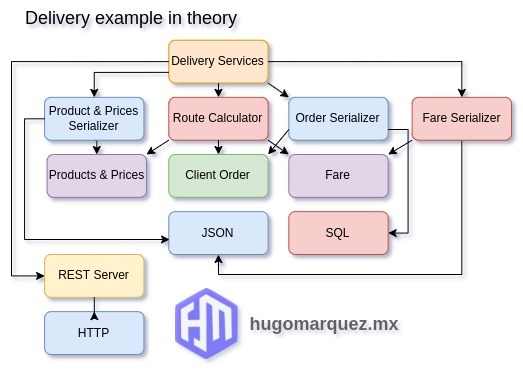
Where you have your modules separated by domains, in theory you can test and develop in isolation. This kinda looks OK, though we all know this is not going to be maintained and sooner than later we ended up with something like this:
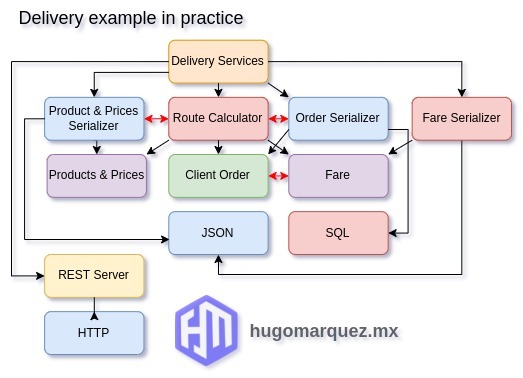
In practice, we ended up mixing and matching our modules, soon the route calculator module will be requiring the prices serializer and the order serializer modules as dependencies and as a result their dependencies and compilation flags. So what do we do? the typical solution is to group those modules.
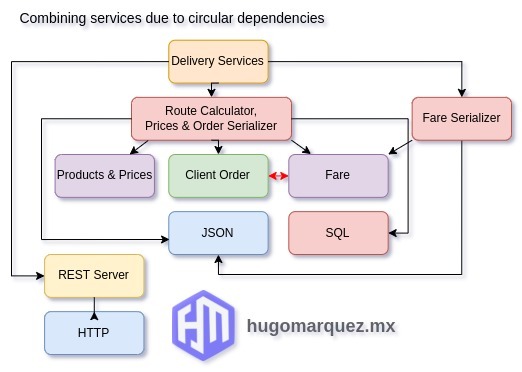
And more grouping needed in the client's orders and fare modules:
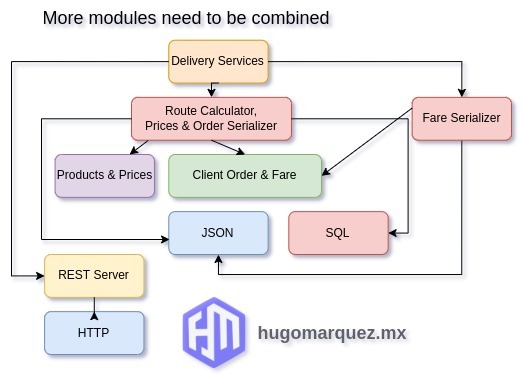
But the problem with this "solution" is that we ended up with a big monolithic code base, with a compilation nightmare where updating or changing one dependency affects modules who don't even directly use that dependency so we ended up declaring every dependency as public 🤢.
If you need a more in depth example, Mathieu Ropert talked about the benefits and patterns that can be used for modular design using CMake in his CppCon 2017. I highly recommend watching Ropert's talk.
So what is the "real" solution then?
I believe a solution to this problem is to force ourselves to a module oriented way of thinking by creating shared libraries whose purpose are very specific to a certain domain. To achieve this with modern CMake we need to use the target specific commands, to learn more about this I recommend Kuba Sejdak's blog post on targets and properties.
Using this approach will allow us test and develop software on isolation and without affecting other modules. Of course there should be a judgment call on whether a certain module should include more or less since there is a limit to what can be tested and developed on isolation.
Project Structure Convention
Now that we have the modular design mindset, it's time to propose a simple structure for our projects, this will help us maintain a modular design mindset and our test driven development. We can start our project tree with the following folders and files:
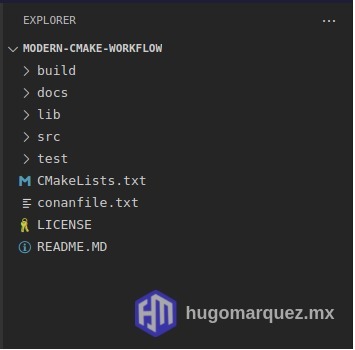
- Build: This is required by CMake, it is the place where the build files will be created, it might be a Makefile, etc.
- Docs: We should always document our projects, if you use a documentation generator like Doxygen, then this is the place where it should generate the docs.
- Lib: Here we might store 3rd party libraries that were not available through Conan, it can be a git submodule.
- CMakeLists.txt: This is our entry point in the build process, you can start by using our example shown above.
- conanfile.txt: Our Conan file where we declare our dependencies, similar to npm and package.json.
The src directory
The source directory is the place where we put our sources, headers and modules. It should also contain our main entry point via an executable or library. The modules inside this directory should follow a simple convention:
- The module's name is the root folder of that module's directory.
- Every module should include a CMakeLists.txt, where it will be declared as a target library or executable as well as all its dependencies and compilation flags.
- The public headers of a module should reside in the following structure: include/{namespace}/{module's name}/.
- The private headers and sources of a module should reside inside the root directory of that module.
- Always link to a dependency as private unless it is necessary to explicitly make it public.
The test directory
This is where we put or tests, but we need some structure as well. For our test's directory we need to use the following convention:
- Tests for the main executable should be put in the test's root directory.
- Every module's test should use this structure: test/{namespace}/{module's name}/.
- Include the module's test headers in the test executable.
Dependencies and Package Managers
For dependencies and packages management I like to use Conan. With this tool you just specify what package or library you need for your project on a conanfile.txt and Conan will be in charge of downloading the appropriate sources and headers.
To search for the available packages and their versions we need the ConanCenter, which is a repository where people share C/C++ packages. There we can search for a package and choose an appropriate version to use on our projects.
[requires]
spdlog/1.4.2
catch2/2.13.7

[generators]
cmake_paths
cmake_find_package
Conan is more complex than this, but for our purposes this is enough. Also it is worth noting that there are other solutions available like vcpkg and/or just using your default package manager like apt, pacman or yum.
To add a dependency to a module, we need to link that module with the library. Fortunately CMake has modules to help us find those libraries and with Conan this is easier. Next an example based on the upcoming Part II, on how to search and link to a library on CMake:
# Create our shared library and include the sources
add_library(pn-system SHARED
  Logger.cpp
)

# Dependencies and compilation flags for this library
# Find spdlog
find_package(spdlog REQUIRED)
if(spdlog_FOUND)
  message(STATUS "[SYSTEM][BUILD]: Required library spdlog found!")

  # Link to the spdlog library as a private dependency, this means
  # that if another module links to the pn-system library it
  # won't be able to access the spdlog library.
  target_link_libraries(pn-system PRIVATE spdlog::spdlog)
endif(spdlog_FOUND)
What's next?
For Part II and the last part of this series, we will use the above knowledge to create a simple module example using modern CMake, private dependencies, naming conventions and a basic structure to start our test-driven development process.
I know all this information may be a little daunting and confusing, hopefully on Part II this makes more sense and leads you to a happy relationship with this amazing tools.
Resources
CMake is complex, but there is hope!
Learning and using CMake can be a daunting task, especially when you can find out in the wild "old" and "modern" CMake that might confuse you, but fortunately for us there are a lot of great resources by people who are really passionate on build systems and CMake. I would like to recommend some awesome resources to get you started with this enterprise.


